Making the Neck
By John Fisher
Enthusiasm has a great cloak which can conceal lame talents, dwarfed ambitions, & mangy personalities. It has a sparkle like sunlight on rippling waters & can cause dedicated failures to be delightful.
In reality, I could have just bought an already made neck from any one of a variety of sources. (Stewart Macdonald, Warmoth, All parts) Some of these necks are reasonably priced and the advantage of the bolt on neck is that it is very easy to install or switch necks. But I thought of giving it a go to make one and it would also save me some money although it takes a lot of work to make a good neck.
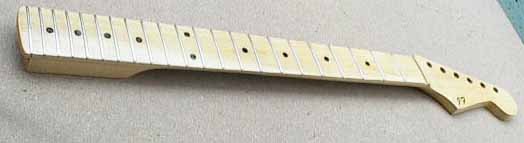
Again, I didn't have the availability of maple when I was in Brazil so I used a suggested substitute for the neck wood. I used a wood called "Ivory Wood". It is very hard and beautiful and it looks to me just like maple. My only concern is how stable it might be. As of this writing, I have had no problems of lack of stability.
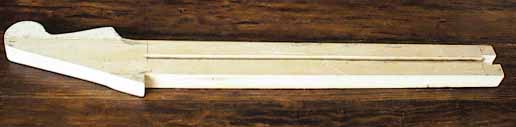
In making the neck, I wanted to leave it basically square while cutting the groove for the truss rod and even gluing the fret board on and making the fret slots. This is because it is a lot easier to get things straight and accurate when you have the reference of a square block. In the case of the picture above, I had to glue some extra wood on the head stock for the shape of the head to fit. I wanted to later glue some birds eye maple veneer on the head stock to cover any witness lines of the glue job but later on I realized that you couldn't see any glue lines so I just left the head plain.
Please note that most Strat necks are one solid piece of wood where the fret board is the same piece as the neck and they router out the back of the neck to put in the truss rod. I think there was a few models made in the 60's that had a separate maple fret board glued on. Of coarse there are some Strats with glued on Rosewood fret boards.
At this point it is especially important that the top surface of this piece of wood is flat.
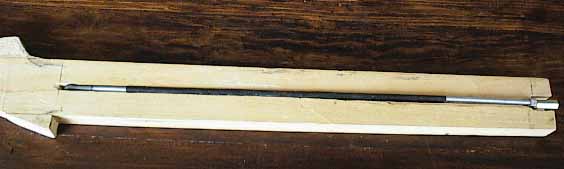
Here is my home made truss rod that is placed in the slot and ready for the fret board to be glued on. I will explain more about the truss rod on another page.
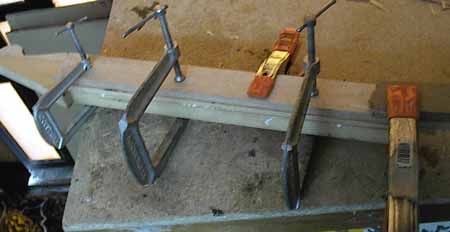
Here I am gluing a flat 1/4 inch piece of Ivory wood onto the neck. I have another thicker flat piece of wood above it in order to help it glue nice and flat. I have it clamped with several clamps and I try not to make any one clamp tighter then the others as to make it glue evenly. I prefer to shape the fret board after glueing it on as to ensure a straighter surface when the neck is finished.
Following is the measurements where the frets go on the fret board. The first chart is metric and the second is in inches. I got these details from the fret calculating program that you can download from the main page of my web site. I printed out a template as not to have to measure each fret and it worked beautifully.
Scale Length: 647.5 mm
Fret Number mm from Nut mm from Fret
=========== ============ =============
1 36.5 36.5
2 70.5 34.5
3 103.0 32.5
4 133.5 30.5
5 162.5 29.0
6 189.5 27.0
7 215.5 25.5
8 239.5 24.5
9 262.5 23.0
10 284.0 21.5
11 304.5 20.5
12 324.0 19.5
13 342.0 18.0
14 359.0 17.0
15 375.5 16.0
16 390.5 15.5
17 405.0 14.5
18 418.5 13.5
19 431.5 13.0
20 443.5 12.0
21 455.0 11.5
22 466.0 11.0
Scale Length: 25.50In.
Fret Number In. from Nut In. from Fret
=========== ============ =============
1 1.43 1.43
2 2.78 1.35
3 4.06 1.28
4 5.26 1.20
5 6.40 1.14
6 7.47 1.07
7 8.48 1.01
8 9.44 0.96
9 10.34 0.90
10 11.19 0.85
11 11.99 0.80
12 12.75 0.76
13 13.47 0.72
14 14.14 0.68
15 14.78 0.64
16 15.38 0.60
17 15.95 0.57
18 16.48 0.54
19 16.99 0.51
20 17.47 0.48
21 17.92 0.45
22 18.34 0.43
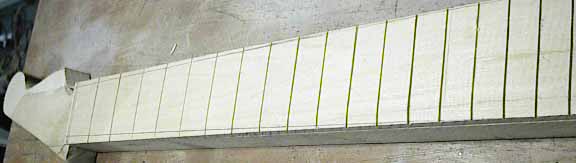
You will notice that in this case, I still left the neck and the fret board square as to be able to accurately draw the fret slots with a small square. The top of the fret board is still flat and not curved yet. Using the square along side the fret saw I partially cut the fret slots as to mark where they are. The reason why I did this at this point was that I still need to carve the curve of the neck and I don't want to lose where the fret slots will be after rounding the fret board. This may be an unusual sequence on how to do this but it worked well for me.

I now turned the neck on it's edge and drew and rough profile.
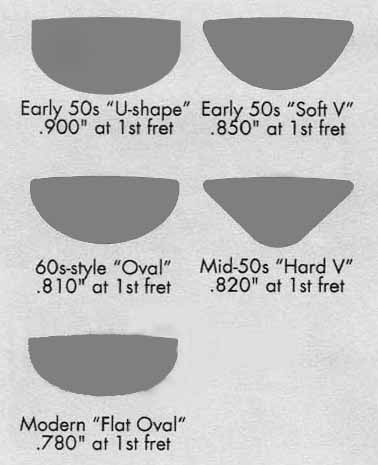
Here are some different strat neck shapes and their descriptions. This is totally a matter of preference. I chose something similar to the 60s Oval style only I made it a bit thinner (.780 at the first fret) as I personally prefer a thin neck and my son who is 12 years old has small hands.
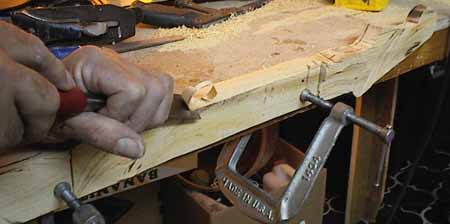
Here I am beginning to carve the neck. I used a chisel, wood rasp, knife, sanding block and belt sander to do this.
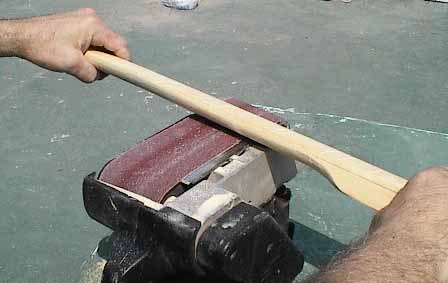
Here I am using a belt sander to round the back of the neck. This works very good and fast but you have to be real careful as it takes it off real quick.