The Neck
By John Fisher
"You're never too old to become younger."--Mae West (1892-1980), U.S. actress
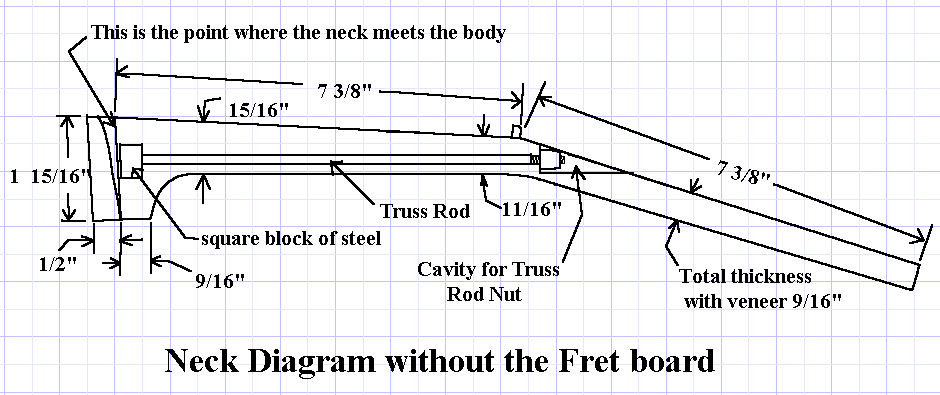
Here is the neck with the dimensions. I made the neck out of hard maple quarter sawn. The tricky part is getting the neck joint right as it is connected to the body on an angle. Besides getting the angle right to the body it is a tedious job trying to get a good fit into the body.
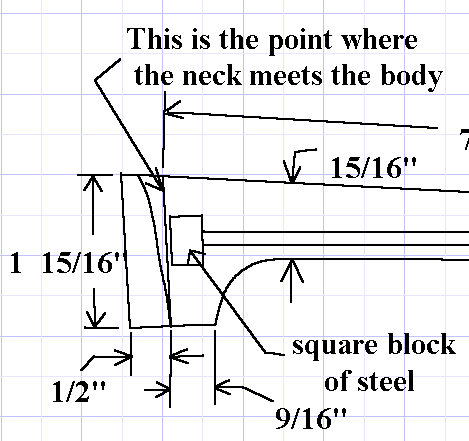
This is a closer look at the heel area of the neck. Although I marked where the neck meets the body, the curved line behind it exists because the outer edge of the neck coupled with the fact that the neck fits the body on a slant will make the neck conform to the body on an angle.

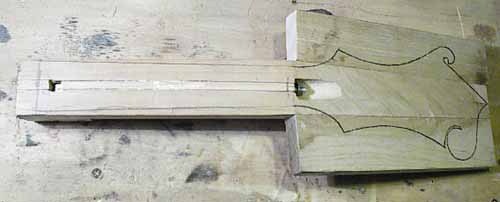
Here is the top view of the neck. You will notice how it needs to be shaped to fit around the body of the mandolin. Once the truss rod is inserted, a maple filler stick was glued in to fill the remainder of the groove space.
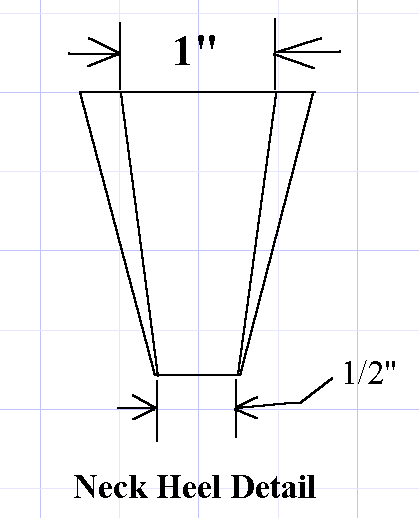
Here is the end view of the heel of the neck. There is more then one way to connecting the neck to the body. A traditional dovetail looked a bit scary to me so I used this alternative method which is a beveled slot for the neck to fit into. I will explain more about this later on.
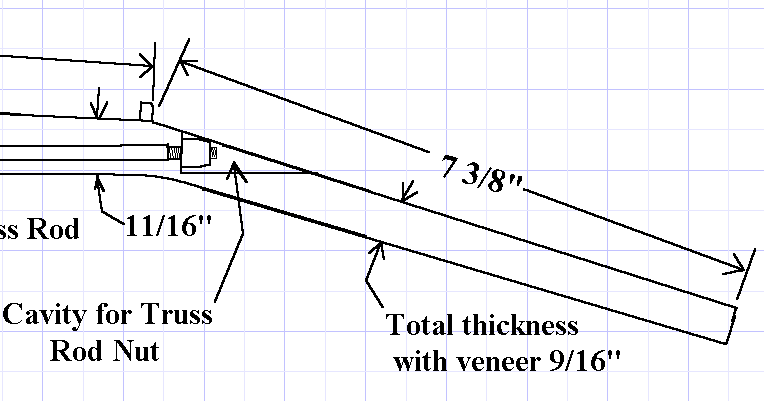
Please note that the thickness of the head is with veneer glued on to it. The truss rod nut just clears the top surface of the head where a plastic truss rod cover will be attached.

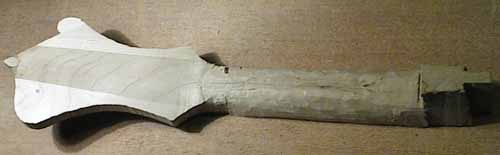
Here is the very rough block of maple that I used for the neck. As you can see, I cut the angle for the head then I glued 2 wings where the head will later be shaped. The wings were made of some maple floor boards that someone gave me. The most important thing here is that the area that the fret board will be glued on is totally flat and the area of the head is flat also. Black veneer will later be glued on to the head surface.
The Truss Rod
The Truss rod is used to create a counter tension on the neck to counteract the pull of the of the strings. Looking at a mandolin you may think that with such a small instrument, there surly is not a whole lot of tension on the neck from the strings but the truth is just the opposite. Although the string length is a lot shorter then a guitar for example, the strings are tuned quite a bit higher in pitch then a guitar which creates quite a bit of tension. Besides this is the fact that there are 8 strings on a mandolin instead of 6 strings that you normally find on a guitar. So the neck has to be attached quite strongly to the body.
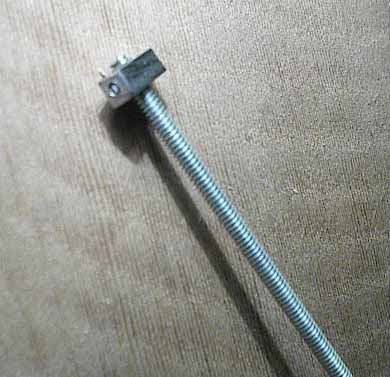
If you go to the beginning of this page you will see how the truss rod is positioned in the neck. This particular truss rod is very simple compared to some others. It is normally a 3/16" steel rod that you can find at a hardware store. Which is threaded on one end to receive the nut for adjusting. Instead of using a rod that needed to be threaded on one end, I just used a rod that was already threaded throughout the whole rod that I also found at the hardware store. This is easy to find and very cheap. The rod needed to have some kind of an anchor so that the rod itself would not turn during adjustment of the truss rod but only the nut would turn. For this: I got a little piece of 1/4" square steel bar that I cut about 5/8" long. I drilled a hole and threaded it to receive the end of the threaded rod. Now it is important that the rod also does not turn in the hole of the anchor so I drilled a small 3/32" hole through the side of the little metal block and into the rod and inserted a tight fitting nail in the hole. This fastened the anchor to the threaded rod so it would not turn in the hole. (See above picture)

Here I am making the slot for the truss rod in the neck. The slot will be a deeper on the heel end then it will be on the nut end of the neck. The slot (which is as wide as the rod 3/16") should be about 13/16" deep on the heel end of the neck and about 7/16" on the nut end of the neck. This tapered slot can be done using a router and making a tapered jig but I just decided to do it by hand which to me was faster then trying to make a jig of some sort. I first cut 2 grooves with a hand saw that reached the desired depth of the tapered slot.
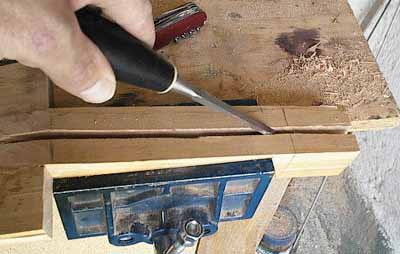
I then chiseled out the groove with a narrow chisel checking frequently with a straight edge. The truss rod should sit in the slot nice and flat and not too tight as to be able to move freely when adjusted. You also will not want it so loose that is will rattle when playing. One idea is to put a thin strip of felt on the rod before filling the slot with the wood filler stick. The filler stick should be glued in the slot after the truss rod is inserted and then sanded flat with the top of the neck before the fret board is glued on.
I also made a small square hole for the anchor to fit in on the heel end. This should be tight enough so that it will not turn in the neck when the truss rod is being adjusted.
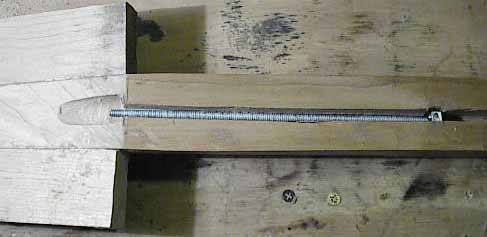
Here is the truss rod siting in the slot. Notice the anchor that needed to be fitted in the neck. Also notice the cavity that I had to cut out to leave room for the adjustment nut at the head. I used a Dremil high speed drill for this but it can be done with a chisel. (See in the photo my overly abused work table) On the nut end will also need a washer ground to fit the shape of the cavity to accommodate the nut against the wood. Note that the cavity in the picture for the nut is cut out fairly close to the where the nut (for the strings) will be. In the diagram further up I have the cavity further out that is more common with Gibson instruments. This will determine what style of plastic cover will be used.
Here is the neck with the maple filler stick glued in to fill the truss rod slot. It shouldn't be too tight or too lose on the truss rod but just loose enough for the truss rod to move when adjustment is needed. Like I said above, putting a little felt over the truss rod first before covering with the filler stick will help prevent the truss rod from rattling later on when played. Notice that I am already planning the shape of the head to be cut out.
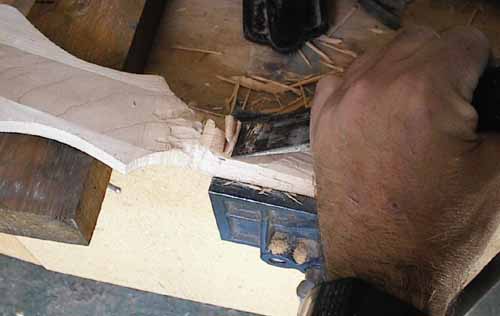
In carving the neck I removed most of the bulk material with a chisel and a hammer. I then used a scraper and finally a rasp and sand paper.
Here is the back of the very rough cut neck. I like to do some of the final shaping of the neck while it is attached to the body. This gives me a better feel how I like to custom carve it although I won't stray too much away from the general dimensions.