The Fret Board
By John Fisher
It's strange how much you've got to know before you know how little you know!
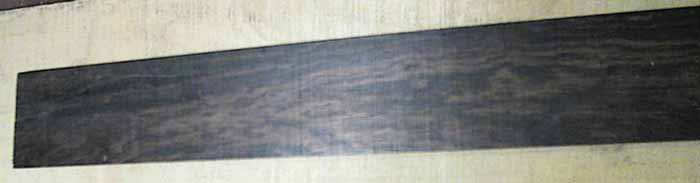
Here is the wood that I used for the fret board. It's called "Bocote". I believe it's from Mexico. It is a very beautiful exotic wood similar in color to rosewood but it has a slightly more interesting and exotic grain to it. It is a hard wood with sort of a waxy texture to it. In my opinion, this wood is ideal for fret boards that don't have a lot of inlays on it because the grain itself is very beautiful and you don't want to cover it up with distracting inlays. In my case I really wanted to do some fancy inlays with abalone shells and this is the only wood I had at the time for the fret board. I would have preferred ebony in this case for the fret board which really gives good contrast visually for fancy inlaying. But never the less, I used the Bocote. The Bocote is quite waxy and has a lot of resin in the wood so although is was fairly easy to sand, the sandpaper would clog up very easily with the waxy resin. I had to change the sand paper quite frequently.
Generally speaking, unlike many radiused fret boards on guitars, the mandolin fret board is flat.(At least this one) I sanded it flat on both sides to a finished thickness of 3/16" thick.
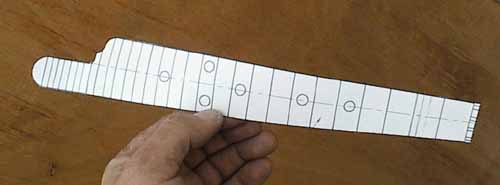
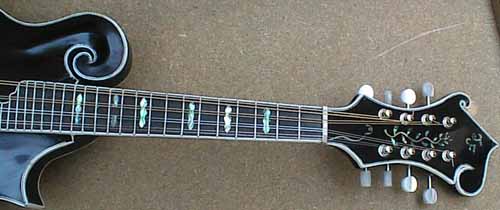
Here is a template I made out of paper of the fret board. I first thought, because the mandolin is smaller then a guitar, the fret board would be simpler to do. I was mistaken. Normally a guitar has about 20 to 22 frets. This mandolin has 29 frets. Not only are there more frets but it is more critical to get it right because of the shorter scale length. Although this template has round dots as markers, I made my own custom shaped inlays. This template at least shows you on which frets the inlays will go.
|
Fret Number
|
Millimeters from Nut
|
Millimeters from Fret
|
| 1 | 20.0 | 20.0 |
| 2 | 38.5 | 18.5 |
| 3 | 56.0 | 17.5 |
| 4 | 72 | 16.5 |
| 5 | 88.5 | 15.5 |
| 6 | 103.0 | 15.0 |
| 7 | 117.0 | 14.0 |
| 8 | 130.5 | 13.0 |
| 9 | 143.0 | 12.5 |
| 10 | 154.5 | 12.0 |
| 11 | 165.5 | 11.0 |
| 12 | 176.0 | 10.5 |
| 13 | 186.0 | 10.0 |
| 14 | 195.5 | 9.5 |
| 15 | 204.0 | 9.0 |
| 16 | 212.5 | 8.5 |
| 17 | 220.5 | 8.0 |
| 18 | 228.0 | 7.5 |
| 19 | 235.0 | 7.0 |
| 20 | 241.5 | 6.5 |
| 21 | 247.5 | 6.0 |
| 22 | 253.5 | 6.0 |
| 23 | 259.0 | 5.5 |
| 24 | 264.5 | 5.0 |
| 25 | 269.5 | 5.0 |
| 26 | 274.0 | 4.5 |
| 27 | 278.5 | 4.5 |
| 28 | 282.5 | 4.0 |
| 29 | 286.5 | 4.0 |
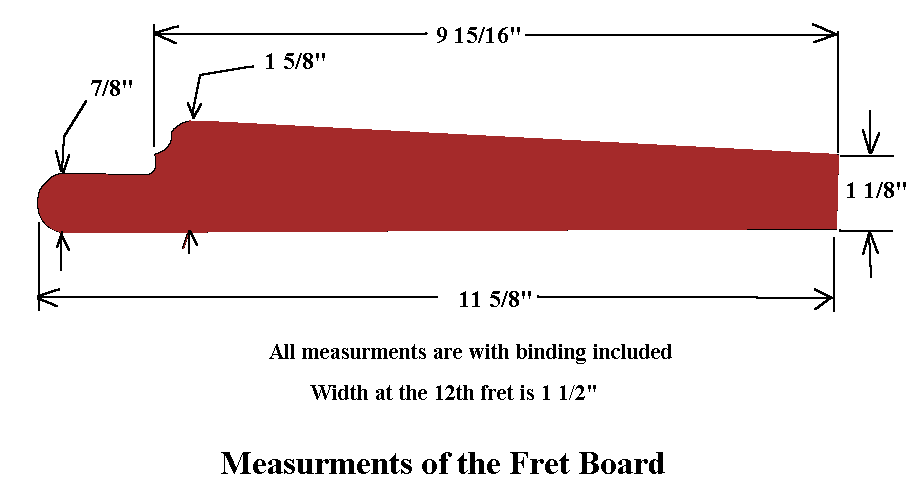
The scale length of the fret board is 352.5 mm or 13 7/8". Although I posted the fret board data above, you can go to the Home page of my web site and download the Fret calculating program which will give you the same information and you can even print out a template of the fret board. Printing out the fret board template is the method that I use for marking where the frets go which is much easier then measuring where each fret goes. The fret board layout can be printed and used as a template.
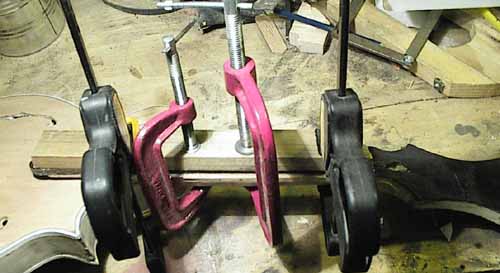
Here I am gluing the fret board on the neck using 4 clamps and a piece of wood that I know to be flat. The only difficult thing about this is to make sure that the fret board does not slide out of place in any way. It is good to also clean up any squeeze out of the glue before it dries as you will need to have a clean surface to glue to the binding. The neck itself is left over sized slightly to receive the plastic binding around the edge. After the binding is installed, I then finished shaping the neck until it was flush with the binding. I used common white wood glue to glue the fret board on as the fret board can be removed with hot water and a knife if ever necessary some day.
When using the PVC plastic binding for around the fret board, I was able to use a common hair dryer to bend the binding into shape around the detailed shape of the body end of the fret board.
The Frets
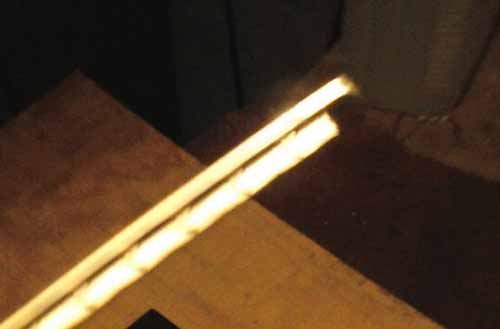
Above is a the best I could do of a picture of a fret close up. I will not go into lots of details of how I installed the frets as I have talked about it in other articles of other projects on my web site. I will say though that I first cut the fret slots and then did the binding around the fret board before I installed the frets. This is similar to how I did it with my Les Paul project. After the binding was installed on the fret board, I pre cut each fret to fit the fret slot leaving a small length of the fret top that will go over the binding. After the frets were installed, I then filed them smooth to the edge of the binding as not to have any sharp edges that might catch your hand while playing the mandolin.
Mandolin frets are a bit on the thinner side compared to most guitar frets.

I would like to thank my friend Sean who sent me these beautiful Paua shells from New Zealand to do the inlays. They are very beautiful and a step up in beauty from abalone shells. It took some work to grind them into shape and I used the sanding drum attachment on my "Dremil" high speed drill to grind them flat. These were a bit more delicate to work with compared to the mother of pearl that I was normally used to, but I was able to strategically cut them into the different shapes I needed.
The Nut
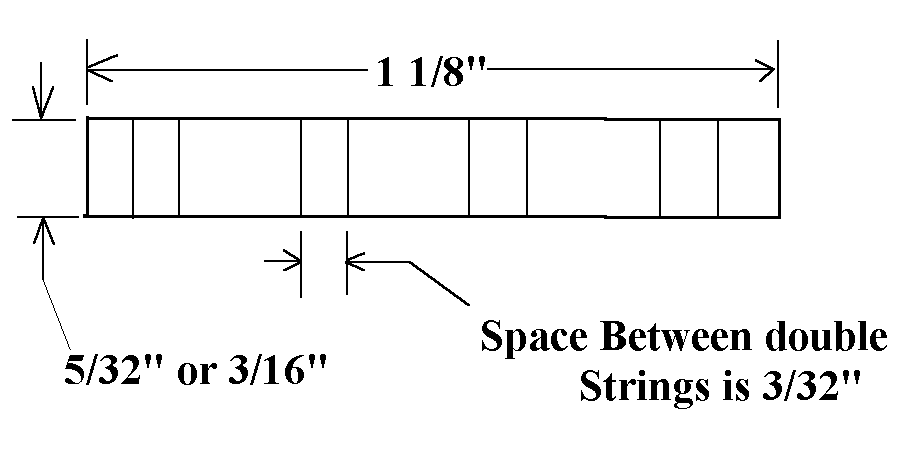
I made the nut out of a piece of bone that I got from the butcher. Above is a diagram of the top view of the nut. The general spacing is about 3/32" between each string but you may want to go very slightly wider on the bass strings and slightly narrower at the treble strings.
Every mistake can be a steppingstone if we learn our lesson from it.