Finishing
By John Fisher
Laziness is often mistaken for patience.
The secret for patience is doing something else while your waiting
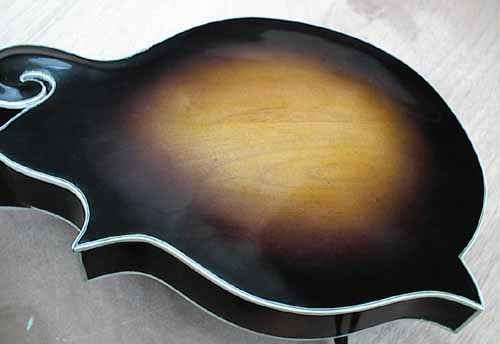
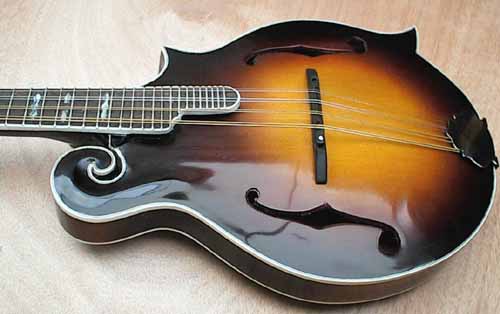
There are a few things I like about a sunburst finish. First of all I think it just looks really cool as the different shades add dimension to the overall look. The second reason why I like a sunburst finish is that although you can see the natural wood, it is possible to cover up any flaw in the wood around the edges. I have found that most of my mess-ups I make on preparing the wood for finishing usually occur near the edges of the instrument with mistakes or unintentionally chipping or sometimes errors while doing the binding. The other option is to just paint your instrument a solid color. When doing this mandolin, it was a very new experience for me and I really didn't know what was ahead for me. I did have some flaws around the sides in different places that I used either wood filler or even auto body putty to correct. (Especially around the scroll area which was challenging for me) Fortunately I was able to cover up most of my mistakes with black lacquer and the middle of the top and back looked decent enough to display it's more natural beauty.
\
Following is the basic steps I used for finishing the mandolin:
I sanded the whole surface with thick to finer sandpaper starting from #100 grit working up little by little until I finished with #220 grit. It is important to not skip grades of sandpaper as although you will end up with a smooth finish, you can still end up with deep scratches form former sanding with thick sandpaper. Go #100, #150, #180, #220. I try to sand with the direction of the grain. If you are faithful to go step by step with different grades of sand paper then the sanding will actually be easier with less work. After all, who likes sanding? I use a flat rubber sanding block especially on flat surfaces like the head of the mandolin. A rubber sanding block is ideal but if you don't have one, you can make one by getting a square block of wood and gluing a piece of rubber, felt, or a piece of computer mouse pad to it. The cushioned surface of the sanding block will help the sandpaper to to last a lot longer and it will help prevent it from clogging up too easy.
Usually after I think that I have everything sanded well, I sometimes will rub a bit of quick drying sanding sealer over the surface with a cloth. This will show you right away if you really did sand it properly and if there are still flaws, they will show up. You want to make sure everything is good with no flaws before applying finish. It is a never ending lesson with me that the less thorough that I am with each step, the more fixing up I have to do later.
After you know you are done sanding it is good to wipe the surface with a damp rag (not too wet) and let it dry. This will raise the grain somewhat. Go over it a bit more with the fine sandpaper then dust it well will a dry cloth and or a vacuum cleaner.
Masking
Now it's time to stuff some rags through the "F" holes so that when the mandolin is sprayed it will not paint the inside of the mandolin. Do leave the edges of the "F" holes exposed so they can be painted well. I then covered the plastic binding with masking tape. This takes a bit of patience just like you would mask a car that you are going to paint but then it's a lot smaller then a car. Thank God! After I put on the masking tape I usually press the edges of the tape real well with my fingernail to make sure that is is stuck well. The binding of the fret board and the fret board will also need to be covered with masking tape and paper.
The Yellow Dye
After the mandolin is masked, I used yellow dye that I rubbed on with cotton where the main sunburst areas will be. This can be sprayed on but I found that rubbing it into the wood with cotton or a soft cotton cloth helps the grain to come out better in appearance adding more dramatic contrast. (Use rubber gloves if you don't want to stain your hands. Although alcohol dye can be used, I made this particular yellow dye by grinding up clothes dye that I bought locally and dissolving it in lacquer thinner. I found this to be a good cheap alternative for just about any color dye that I need. For a water based dye you can also devolve the die in hot water.
Starting the Sunburst
After I dyed the desired yellow areas where it is time to prepare for doing the rest of the sunburst. I first sprayed a light coat of clear sanding sealer over the yellowed surface of the mandolin. The higher solid content of the sanding sealer helps seal the wood and gives a more consistent surface for the rest of the finish to be applied. For the rest of the sunburst, I used ready made alcohol dyes that I bought from the paint store. They must be alcohol based dyes if you are going to mix them with lacquer. Doing the sunburst is not terribly hard but you may want to experiment on a piece of wood before attempting to do the mandolin, so you can get the desired effect. After dying with the yellow I made up about 4 other mixtures that I put in separate bottles. In each case it was a very thin clear lacquer mixture with the appropriate dyes mixed in them. I can not tell you the exact amount of everything but it was just through experimenting that I got the correct effect. It is better to not make the mixtures too concentrated with dye but make it so that you could spray it a few times the get the right density on each stage of the color, This helped the different shadings to blend better with each other. I used a very small compressor that I got cheap at a flee market. It is a compressor that doesn't even have an air tank and it is small enough to carry on a buss if needed. The spray gun itself was also pretty cheap but it works well and I can easily get a very fine spray if desired. This is important because you can't do a nice sunburst if the spray gun is spitting any globs. I set it to make a very fine spray with a small amount of paint coming out at a time.
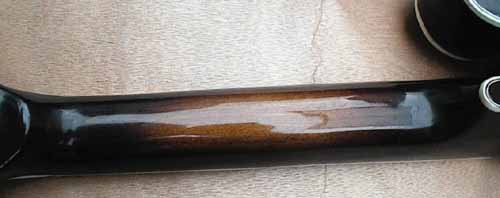
I did the same procedure for sun bursting the neck as I did on the other parts.
This is a matter of taste how it is done but I started by spraying reddish mahogany spray first as the first color coming after the yellow center of the top. I then I mixed a bit of walnut stain with it and went a little further out towards the out edge or perimeter of the top. While spraying I slightly tilted the mandolin on about a 45 degree angle as I sprayed pointing the spray gun towards the outer edge (not towards the middle) as I sprayed. I then changed the mixture to just walnut color going a little further. I then mixed a little black dye with the walnut as I went further to the outer edge. I finished with pure black lacquer on the very outer edge that completely covered the wood and contrasted well with the white and black plastic binding around the outer edge.
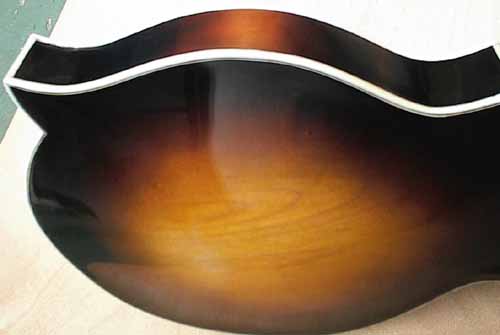
I also did a slight sunburst on the sides that helps accentuate the curves of the body.
Important Things to Watch out For:
It is imperative that your spray gun is very clean before adding the mixture. The mixture should also be strained through a clean cloth or cloth diaper to get out any junk that might be in there. There is nothing more annoying then having it spit out some trash just when you thought you had the perfect sunburst almost finished. If this happens you may have to wipe off everything with lacquer thinner and start again.
You may want to do your sunburst first on the back. Not that the back isn't important, but it's nice to really have the feel of it and be even more practiced up before you begin starting on the front.
Applying the Top Coat
After I got the sunburst to look the way I wanted, I let it dry for about an hour or more then I prepared a mix for the clear lacquer top coat. If you have seen my work area and work conditions, you will note that I don't have a humidity controlled painting booth. I do most of my painting outside. Fortunately Mexico city is pretty dry most of the time but there is a rainy season. One very common problem while spraying lacquer is that you sometimes get what you call blushing. This is where tiny little bits of moisture get trapped in the lacquer and because lacquer dries so fast, it could stay there before the moisture has a chance to surface. The applied lacquer will look a bit milky. It could sometimes go away but other times it won't or is will leave tinny bubble holes in the finish when dried. This problem is more common when there is a lot of humidity in the air. I found in my situation that it is best to spray paint in the late morning or in the early afternoon when the air is dryer. In the early morning, even if it is sunny there still may be dew left in the air from the night before and in the late afternoon it starts to get a little cooler and more humidity begins to set in. Never paint when it is overcast or rainy. There are a few other factors that help to combat blushing. A lot can depend on your thinner. If it dries too fast it can cause blushing. If there seems to be a tendency to blushing it is helpful to apply thinner coats. Remember that what is happening is that the trapped moisture is in a race to get to the surface before it dries and if the finish is put on too thick at a time it makes it easier to have blushing.
Using Retarders
Another thing that is helpful to prevent blushing is to mix in a little retarder. This is an additive that simply slows down the drying time of the lacquer and in my opinion, in some cases helps the finish to go on a little smoother. I won't suggest any particular brand and mixture details because you would have to follow the instructions of the particular product you are using. I only use it if I need it and the amount I use depends on how much of a problem I am having with humidity. Just ask your supplier what he has available and follow the instructions. One of the main things that you have to do is get used to whatever brand of products that you are using. There are so many different products out there and I have just learned through a lot of trial and error how to use different products that are available as things can vary. Some retarders if you put too much in can cause the finish to not harden properly. With the retarder that I use I might put 10% mixture of retarder into the lacquer and it will dry to touch in say 15 minutes instead of 7 to 10 minutes.
I like to mix the lacquer with lacquer thinner enough so that it lays on smoothly but also makes some progress in a build up of the finish. This could be 30% to 40% lacquer to the rest lacquer thinner depending on how concentrated your lacquer is. I put on several coats, waiting about 1/2 hour between each coat or to where the lacquer is dry to touch.
One other benefit from the lacquer not drying too fast is that it will mesh in better with the previous coats which is important, especially if the coats are already dry after any length of time. After I put on about 10 coats I left it to dry for a couple of days. I then light sanded it with wet sandpaper #400. I don't do it too much because whatever you do, you don't want to accidentally sand into the sunburst. That would be bad. After light sanding just to get it a bit flatter I wiped it clean and when dry I put a few more coats on it (maybe 8 -10 coats) and then I let it dry for about 2 weeks before final sanding and polishing. Although lacquer dries very fast to touch, it still takes time for it to cure as it will continue to shrink more and more as time goes on. It can be polished to look real nice but then after several months after more shrinking, it will start to look a little orange peelish again. So it is good to wait for some time before proceeding. I have heard of some people waiting for months but I don't have that much patience. Ha! One thing you can do is drop fill any nicks or tinny holes. This is where you get some thick lacquer and with a tooth pick you fill any little dings or holes. After applying some in a hole and it dries it will shrink and then you put some more in. When sanded flat it should eliminate the defect.
Final Sanding
After the waiting period for drying was over, I started final sanding it. The object is to have enough of a build up of lacquer on it so that you can sand it to where there are no valleys or shinny spots but that the surface is flat, dull but smooth. If you can get to that point you are near the finish line. I first sanded with #400 paper. If there were any real lumpy spots I would very carefully sand the bad area with #240 paper. I do this very carefully and only on the spots that are absolutely necessary just to get out a stubborn bad area. After wet sanding the whole mandolin with #400, I then moved to #600 and then #800, #1000, #1200 and then I finally finished with #1500. There are finer sandpaper's that are nice to use but I didn't have any.
At this point everything should be smooth with no flaws. You also have to keep in mind while sanding, to go easy on any sharp curve areas (like the scroll area) as it is a lot easier to accidentally over sand through the finish on sharp areas then on flatter surfaces.
Polishing
After everything was final sanded, I then applied rubbing compound. This is the same stuff that they use for cars. I rubbed it in with a soft cotton cloth and then with another clean dry cotton cloth I began to rub it vigorously. When you do this you will get the pleasant surprise of the beautiful shine coming through. This is a bit of hard work to do it by hand but very rewarding. If there is still more rubbing compound left on it, with another clean cloth rub again until there is no more compound left and the finish is shiny.
Another alternative which works well is to use a soft cloth buffing wheel. I got a 6 inch one at the hardware store that fit on my electric drill. This speeds things up tremendously and works great. You just have to be careful as if you press too hard or get it caught on a sharp area you can damage or burn the finish. I just applied it as lightly as possible and it worked wonderful.