Making the Resonator
(Part
3)
By John Fisher
Success is not
measured by the heights one attains, but by the obstacles that were overcome in
their attainment.
After the basic shape of the
resonator was finished I decided that I wanted to put veneer on the outside. I
had a nice wide piece of birds eye maple veneer that was wide enough to cover
the whole back. Now I was faced with the task of gluing the veneer to the round
back. The curve of the round back is about ½" higher in the middle from
the edge. This was a tricky task and one that I could not fail in as I only had
enough veneer for 1 try. I did ask this
question on the internet to find out some interesting ideas. One was to inflate
a bag which would apply even pressure to the gluing surface of the rounded
back. Another idea was to put a bag of sand on it. I tried something different,
which had moderate success. I glued it on using a normal cloths iron.
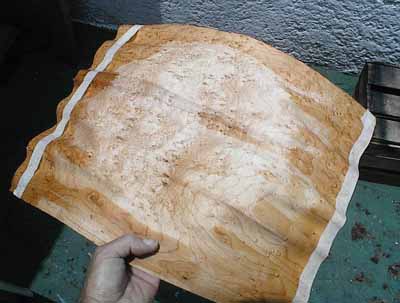
Here is the veneer that I used. I tried soaking it for a while then I tried to make it pre round a bit by heating it on a rounded pot on the stove but to be honest, I don’t think that was necessary. As you can see, it just made a wrinkled mess anyways. The masking tape on the edges was to help prevent it from splitting but after doing all that to it, the masking tape became useless. I found out from a carpenters shop that a good way to glue veneer is as follows:
Paint the one side of the veneer to be glued with white wood glue and paint the wood surface to be veneered also with white wood glue. Make sure that the surfaces are covered thoroughly and evenly. Leaving the 2 surfaces still separated, let them dry until the glue is transparent and not white anymore. I think it is wise to apply a second coat and do the same. There should be enough of a coat on so that the wood is not pores but almost shinny from the white glue.. After placing the veneer where you want it to be glued, then wet the outside surface of the veneer slightly with water and a paintbrush. This is just to help prevent the veneer from being scorched from the iron. Now apply a normal clothes iron that is fairly hot (no steam) to the veneer. The veneer will stick on almost instantly while applying the iron.

Here I am ironing on the
veneer. This was a bit critical and scary for me and there are a couple things
I learned. I started with the iron in the middle of the round surface and little by
little worked outwards. Because there is heat applied, it is not such a problem
to get the veneer to adhere to the rounded surface. That is not a problem. But
I did realized that you can not have any tiny cracks in the veneer or else they
will open up more as there is tension on the veneer because of the round back.
A good thing to do is start working a bit in the center and then let it cool a
bit before continuing and then continue this way little by little. This will
help the progress that has been made to stay firm and not crack as you continue
on towards the outer edge. I did have a bit of a crack in one spot but there
were a lot of natural flaws in the veneer and it still came out kind of artsy.
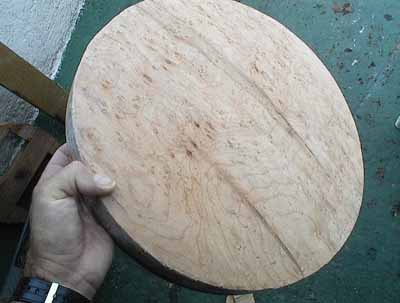
Here is the veneer applied on the back of the resonator. After I ironed on the veneer I trimmed the edges carefully using a sharp knife and then a rasp and then sandpaper. I then applied veneer in the same manner on the side of the resonator.
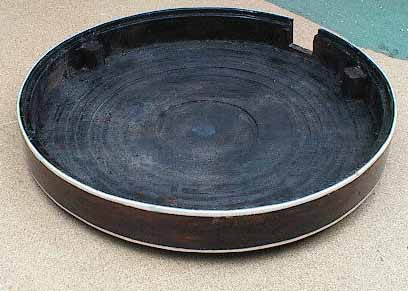
Here is the top of the resonator when it is finished. It is not finished perfectly inside because the banjo pot assembly will cover it so it doesn’t matter too much how it looks. I painted it flat black . The banjo pot assembly, which is the main body of the banjo fits on top inside the resonator on a 1/4" wide ledge that is 1/4" deep. I glued 3 little blocks of wood inside the resonator to be able to screw the pot assembly to the resonator. There are stock parts for this but I didn’t have them so I did this homemade style. I screwed some metal L brackets that I got from the hardware store to the side of the banjo pot in order to then screw that to the little wooden blocks. That is what holds the banjo pot assembly to the resonator.
As you can see, I cut out a little window on the side for the heel of the neck to fit in when the banjo is put together. I routed a groove on the top edge and the bottom edge to glue on the white plastic binding. I made the binding out of a piece of 4 inch PVC sewer pipe that I cut into strips with a hacksaw.
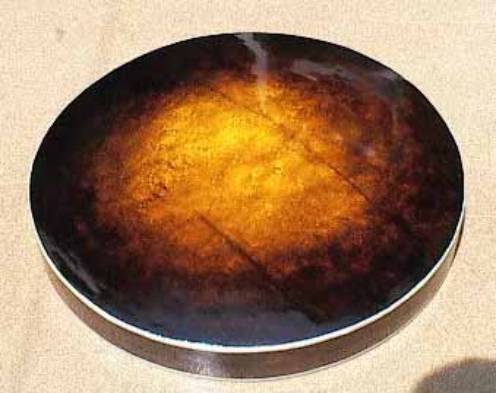
Here is the back of the resonator. This is the Birdseye Maple veneer that I did a hand sunburst on. That was harder for me to do then if I had a sprayer but it came out quite cool and original looking. I first started by applying yellow stain to the whole back. Then I applied lightly some reddish mahogany alcohol stain as it went towards the edge. I then mixed some mahogany stain with some walnut stain and then around the edges I used only dark walnut stain. The trick was to blend it in evenly and artistically, which was a real challenge. The natural flaws in the wood look quite nice. After I got the stain the way that I wanted, I used some spray cans of automotive lacquer that worked very well for a high gloss shine. I don’t normally like lacquer in a spray can but this automotive stuff worked good. I will always stay away from the spray lacquers that you find in the hardware store. They work terrible.
Experimenting
with dyes and stains
I made some new discoveries with dyes and making my own stains. I found that I could mix clothes dye with lacquer thinner to make my own stains. It is very cheep here and for about 50 cents worth of dye I can make a large amount of stain. At one point I also boiled the dye crystals in water to make water based stain for doing a piece of furniture with good success. The yellow stain that I used on the resonator was clothes dye dissolved in lacquer thinner.
The eagle is an
interesting bird. She builds her nest in the tallest trees or on the loftiest
mountain ledges. One who has watched her construct her nest relates that she
first lays down thorns, jagged stones, and all manner of sharp objects, which
seem utterly incredible materials for the purpose. Then she covers it thickly
with wool, feathers, and fur of animals she has killed. The nesting place thus
becomes soft and comfortable, a delightful home for the birds which the mother
will hatch. But the little creatures are not destined to remain in this
inviting cradle so laboriously prepared for them. The time will come when the
mother will stir up the nest. With her sharp talons she will begin to point the
sharp protrusions in their flesh. Up to this time the tiny creatures have had
their food delivered and dropped into their mouths. After the nest has been
stirred up, the eagles become so miserable and unhappy they are willing to get
out, and go somewhere else.
This is the mother's objective in
picking out from the nest all the downy material with which it was originally
lined and casting it to the wind. It is not cruelty on her part, but rather an
effort to produce discontent with the old life of ease, and to whet their
desire to move on to maturity.