The Neck
(Part1)
By John Fisher
(Jon Tirone)
If you find a path with no obstacles--it is probably a
path that doesn't lead anywhere.

I made the neck from a block
of quarter sawn maple starting at: 3” X 3” X 27”.
If you want to know how I
did the truss rod, I did it the same way as the truss rod in my “How to build a
Stratocaster style guitar the Hard way” project. The only difference in the
truss rod I did for the banjo was, instead of covering the rods with plastic
tubing, I incased the rod inside the wooden channel with silicon caulking to
prevent any vibrations of the rod in the neck. All the other procedures to make
the neck were similar to the other neck projects on my web site except for a
couple of details that I will mention. So I will not repeat every single
operation of the neck construction. I will say that I first got the block nice
and square and flat especially on the top surface. This gave a good reference
point to make the groove for the truss rod first before shaping the neck. I cut
the angle of the head at about 20 degrees. The neck was all one piece but I did
glue a couple of small pieces on the width of the head later when cutting the
head shape as it was a bit wider then the 3” width of the maple block. It is
possible to make the neck by laminating thinner pieces of maple together and in
some cases this is desirable for making a stable strong neck. You can even put
different veneers between the laminations for decoration purposes.
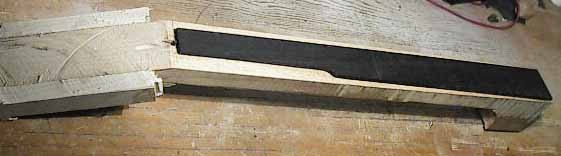
While the neck is still somewhat a block, that is a good time to glue on the fret board and do all the details. You will notice that I did roughly cut out the neck profile although I left the top square. I did this because having this cut out will let the neck warp the way it wants to (if at all) first before I glue on the fret board, which needs to remain flat. After I glued on the already flat and shaped fret board I still ran a flat edge with sand paper over it a bit to make sure that the fret board was flat before doing the finishing touches with the inlays and cutting the fret slots. To do this I glued sandpaper to the flat edge of a carpenters level or this operation.
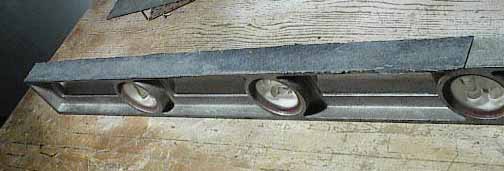
Here is the level with the sandpaper glued to it that I used.
Here is a drawing of the fret board and it’s dimensions without the binding. It was made from a piece of ebony and is ¼ inch thick. Unlike many guitar fret boards, most banjos have a flat fret board with no radius.
After the fret board was glued on, I cut the fret slots. I made the fret scale the same as a Gibson banjo, which is 26 3/16". I used the fret-calculating program that is on the main page of my web site to calculate the frets. I printed it out and made a paper template in order to mark the frets on the fret board. That is one advantage of not shaping the neck yet because I was able to use a square to mark the frets.
Drawing where the fret slots will go using a T square.
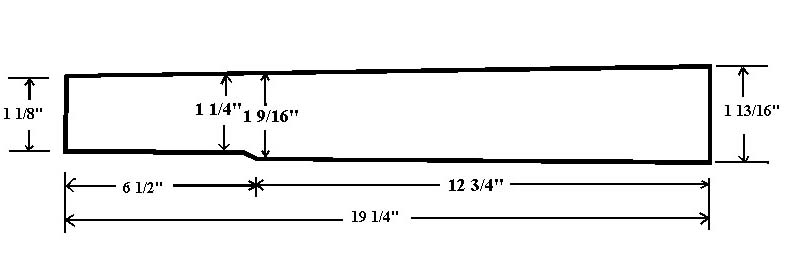
Here is the neck profile with the basic dimensions that I used for my banjo neck. The angle of the head is about 20 degrees. At the heel end there are 2 threaded rods that come out of the heel about 1 inch. This will go through the ½" thick pot wall and with washers in between will connect to the coordinating rods. I will talk more about that later. I wanted to use lag bolts for this but I couldn’t find any locally so I just used 3/16" threaded rod that I screwed into threaded holes in the heel. The truss rod adjustment is also at this end. The fret board is ¼ inch thick.
Roberto Rossellini, late
Italian filmmaker, on learning: "I have an immense treasure: My ignorance.
For me it is a great joy to overcome it. If I can get others to profit from
what I acquire, I have twice as much joy. As long as I go on discovering new
things, life will be beautiful, but it will be too short for everything I want
to learn."